User Interface
🔗Slingshotter's User Interface is split between two main views:
- The Space view, in which you see planets, satellites and rocket trajectories.
- The Base view, in which you design, build and launch rockets, and upgrade your base.
Both views are split in 3 sub parts:
- The 3D view, which you control with your mouse by clicking, dragging and scrolling.
- The timeline, which you control similarly. Scrolling controls the time scale (rather than space scale). Dragging / panning moves the time window forward or backward in time. Clicking sets the time cursor at a given date.
- The editor, which displays specific User Interfaces to view / edit the selected objects.
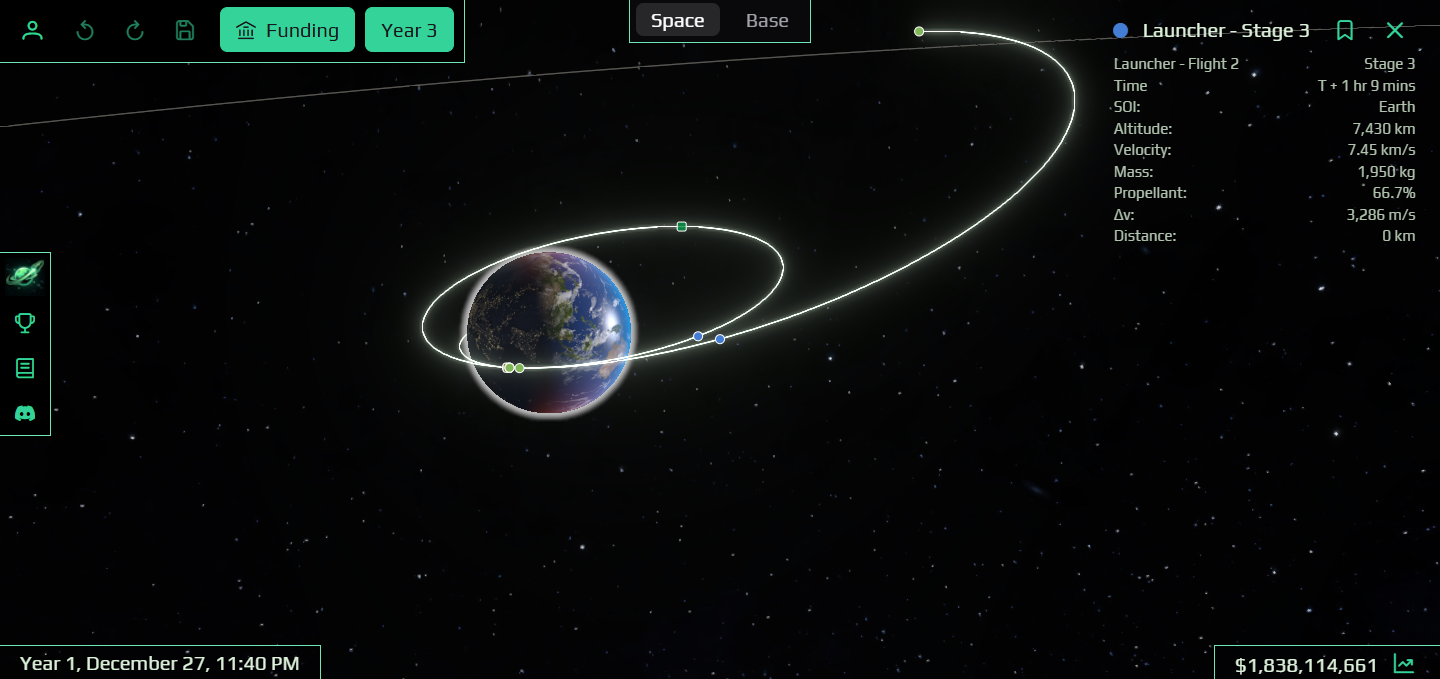
Space view
🔗3D view
🔗In the space view, you can see the solar system centered around the currently selected object, which is generally the rocket that you are flying.
Zoom in and out using the mouse wheel. You may zoom out to the point that you see the entire solar system.
Rotate the view by pressing the mouse left button and moving the mouse.
When flying a rocket, colored dots are visible along the trajectory. Clicking a dot opens a panel on the right with details about the clicked object. There different types of dots:
- Planets & satellites
- Rocket stages (plotted at their location at the current time)
- Trajectory events (Burn events, staging events, Crash & Landing, etc.)
Timeline
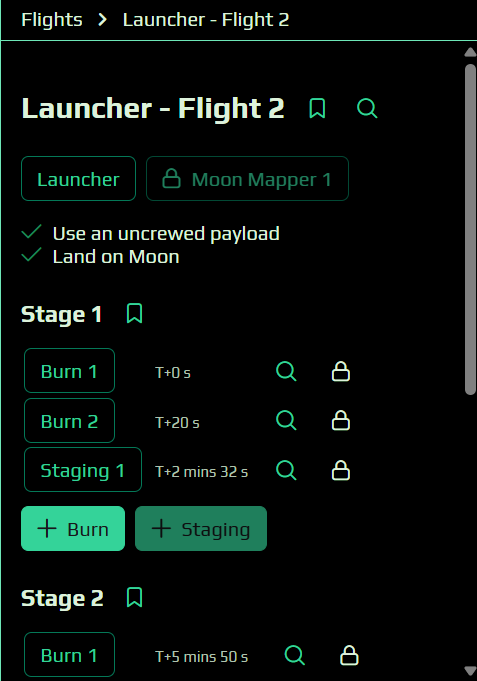
🔗The timeline displays the flight plan of your rocket, which consists of mostly 2 types of events:
- Burn events make your rocket fire its engines.
- Staging events make your rocket stages separate from each other.
The timeline lets you drag events or resize them, which impacts the timing of each burn/staging event. When the flight plan changes, the games recomputes the rocket trajectories and displays them in the 3D view.
Selecting the stage on the left will recenter the 3D view on this stage.
You may click on the Play button on the left to advance the time cursor automatically. Clicking Play repeatedly increases the time speed.

Editor
🔗In the Space view, the editor lets you:
- Add new events to the flight plan (or delete them).
- Edit the parameters of each event (such as a burn's throttle or axis).
- Attach a contract to the flight.
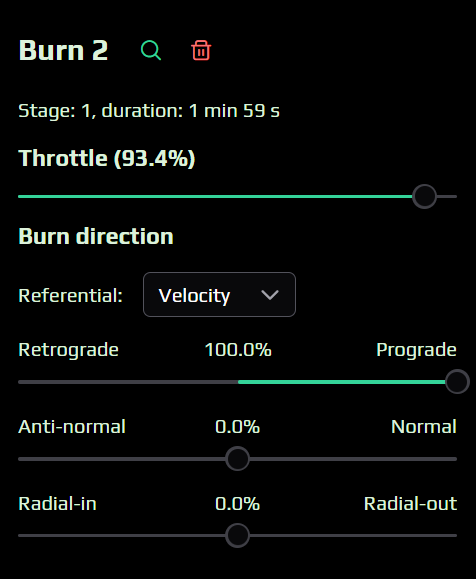
When editing a Burn event, the burn direction is visible in the 3D view, at the location of the burn start, along the rocket trajectory.
You may change the following parameters:
- Throttle: between 10% and 100% of your engines' power
Burn direction (with Reference frame = Ground). The burn direction is computed with respect to the nearest body's vertical direction. This mode is mostly useful for setting up the take off burn, as it should be (almost vertical):
- Azimuth: the horizontal angle with respect to the Eastern direction (0° = East, 90° = North, -90° = South, 180° = West)
- Slope: the angle with respect to the vertical direction (0° = fully vertical)
Burn direction (with Reference frame = Velocity). The burn direction is computed with respect to the rocket's velocity vector.
- Prograde / Retrograde direction: component of the axis that is aligned with the velocity vector. A 100% prograde burn just accelerates the rocket in its current direction. Retrograde burns are useful to decrease the velocity.
- Radial-in / Radial-out: component of the axis that is aligned with the nearest body's vertical direction. A radial-out burn accelerates the rocket away from the body.
- Normal / Anti-normal: component of the axis that is orthogonal to the velocity and the vertical direction. It steers the rocket to the "left" or the "right".
If no flight is selected, the editor simply displays the list of all flights. If you have no flight in this list, you should simply go to the Base view to design, build and launch you first rocket.
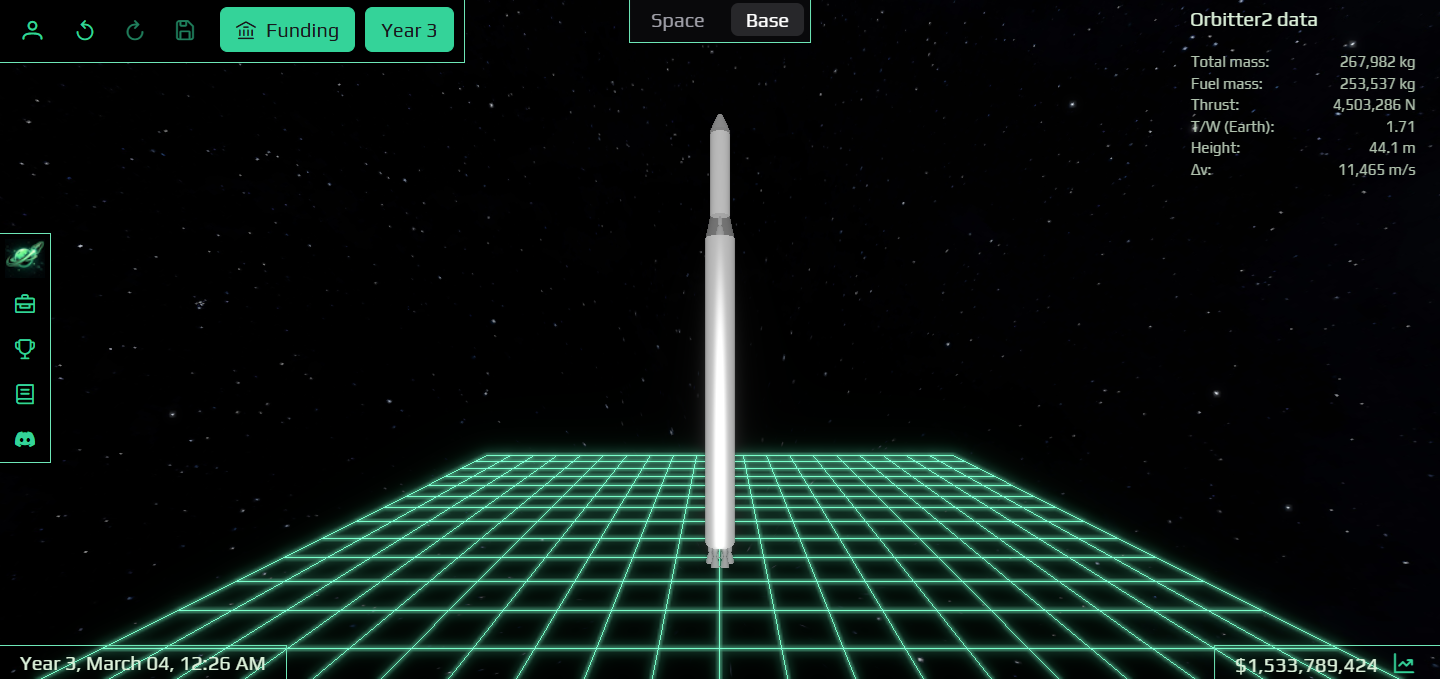
Base view
🔗3D view
🔗In the 3D view, you see the currently edited rocket. If no rocket is shown, create or select one at your Research building.
Zoom in and out using the mouse wheel. Rotate the view by pressing the mouse left button and moving the mouse.
Click on a rocket stage to select it, which opens its editor on the right.
Timeline
🔗In the timeline view, you see one track for each building in your base.
There are 3 types of buildings:
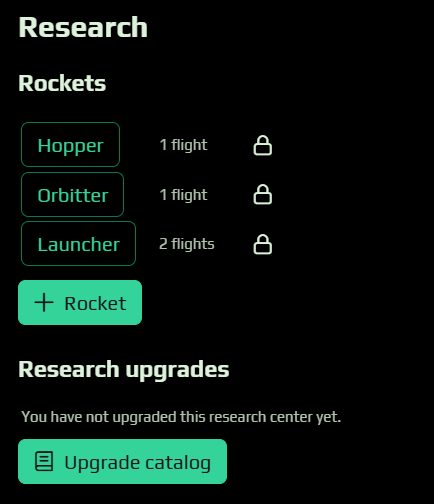
- Research centers: This is where you can create new rockets. The timeline displays 1 event for each rocket. You can build or launch a rocket before its research event is complete.
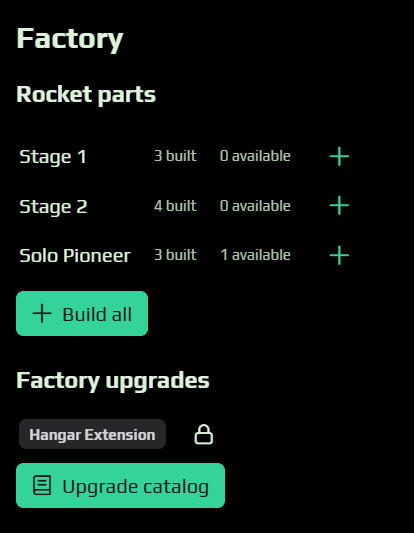
- Factories: This is where you build your rockets after the research phase. The timeline displays 1 event for each rocket stage and capsule. The same rocket can be built multiple times, and some parts can be recovered (they will show as "available" at your factory).
- Launch Pads: This is where you launch your rocket after the build phase. A rocket can be launched once all its parts are available. The timeline displays 1 event for each launch.
In addition, all buildings have 2 other types of events:
- Construction: The initial construction of the building (this is always the first event displayed on the timeline).
- Upgrade: Each building type has an "Upgrade catalog". An upgrade improves the capabilities of the building, but it prevents you from using the building for anything else.

Research editor
🔗The Research editor lets you create, rename and delete rockets, and purchase research upgrades.
Factory editor
🔗The Factory editor lets you build the parts of the currently selected rocket, and purchase factory upgrades.
Use the timeline to select a valid build time (red cursor). The rocket can only be built at a valid time:
- The rocket cannot be built in the past or before the factory construction.
- The rocket must have been researched.
- The rocket cannot be built if the factory is already busy with other builds or upgrades.
- The rocket cannot be built if it exceeds the factory limits (part radius).
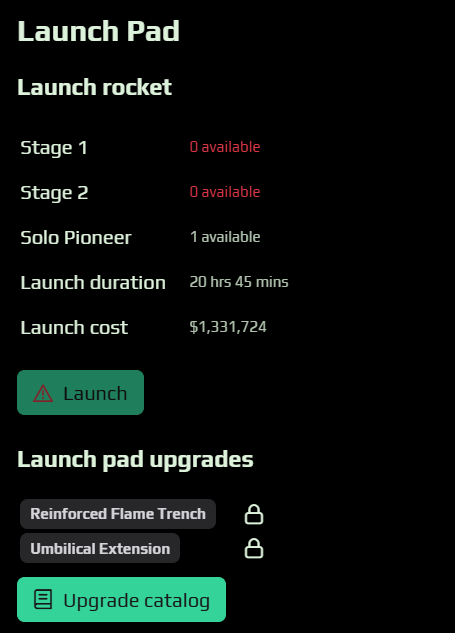
Launch editor
🔗The Launch Pad editor lets you launch the currently selected rocket, and purchase launch pad upgrades.
Use the timeline to select a valid launch time (red cursor). The rocket can only be launched at a valid time:
- The rocket cannot be launched in the past or before the launch pad construction.
- The rocket must have been researched.
- The rocket cannot be launched if some of its parts are not available (build them at the factory).
- The rocket cannot be launched if the launch pad is already busy with other launches or upgrades.
- The rocket cannot be launched if it exceeds the launch pad limits (mass and height).